When I was a kid my grandma used to mail us a tin of homemade Christmas cookies every year. We'd keep them in the refrigerator and mom would let us each have one every day until they were gone. One of my favorites was Sugarplum Drops. They combine the flavor of dried fruits and nuts and sugar - so tasty! When I saw a recipe in Better Homes and Gardens magazine, it brought back all of those Christmas memories. Here's my version.
Sugarplum Drops
Adapted from Better Homes and Gardens magazine Jan 2008
Ingredients:
1/2 cup raisins
1/2 cup dried apricots
1/2 cup chopped dates
3/4 cup dried cranberries
3/4 cup pecans
1 cup whole natural almonds
1/4 cup orange juice
1/2 cup granulated sugar (or use colored sugar for a festive look)
In a food processor, combine the fruits and nuts and pulse until you get a course mixture, about one minute. Add orange juice and continue to pulse until the mixture sticks together (like the photo), about 15 seconds.
Shape the mixture into one inch balls and roll in sugar. Refrigerate.
Makes 40 sugarplum drops.
caloriecount.about.com tells me that each one is 52 calories, 7.2 g carbs, and 0.9 g fiber.
Thursday, November 21, 2013
Saturday, November 9, 2013
Baby Proofing a Book Shelf Tutorial
With my first baby, we didn't have any book shelves where she played, but we protected one of our shelves with our DVD player on it using velcro and a piece of sheer fabric. Then with my son, we just dealt with the book destruction that comes with kids and books. You know all those people who say baby proofing is just for lazy parents who can't teach their kids no? Well whatever. I tried that. We lost some books with my son. No matter how many times you say no, they still want to try to rip paper because it's just so much fun, apparently. Eventually he grew out of it. Even today every once in a while I'll look and see my husband, standing in front of the book shelves, frowning and sighing about all the ripped covers. Sad.
With baby number three, we have two bookshelves in our main living space, and I was considering moving them into my craft room just to keep them out of her reach, but there's really not a great space in there for them. As she's crawling and on the verge of walking, the shelves seem to be a favorite area, and I can see that she's starting to notice the joys of paper-ripping. The other day I found my youngest baby with a choking-sized piece of Robert Jordan's Crown of Swords cover in her mouth, so something had to be done.
There probably isn't such a thing as a baby proof bookshelf, but this is what I did to make my bookshelves baby-resistant.
What you need:
-Enough fabric to cover your shelves. You should probably measure before going to the store, if you're a planner like that. I picked up 3 1/4 yards of chevron printed burlap at Walmart (didn't measure first, so I hoped it was enough and it is more than enough). I guess burlap in the fall is a trendy thing, or something? I would not use any stretchy fabric.
-Coordinating thread. I used tan.
-Grommets (buy the pack of whichever size you like that has the grommet installing kit if you don't already have one)
-Hammer
-7/8 inch cup or mug hooks (4 or more for each shelf) these are the ones I used, but in silver color.
-Felt scraps
First, measure the open area of your book shelf that you want to cover. Then cut your fabric with 1 1/2 inches extra on each side. If you are not using something that unravels like burlap, you may want to make a smaller seam allowance.
When you are cutting burlap, I would not use your nicest scissors as I've heard it can dull them quickly. My really old dull scissors still cut it just fine.
Using a very hot iron (cotton setting), press the seams in twice on two opposite sides (turn under 3/4 of an inch each time), then sew them with a top stitch. I had my machine set with a sturdy needle to stitch length 2 and a narrow zig zag. Then press the other two sides in twice and sew them.
Next, set the grommets in each corner, following the directions on your packaging. I stitched on a small piece of felt in each corner to give the material more strength before setting the grommets. Make sure they are close enough to the edge that your cup hooks will fit over your seam edge and into the hole. Hold a cup hook up to the edge to make sure before you put the grommet in. I avoided putting it right on the seam as much as I could since it would be uneven.
Here's a good video for setting grommets that you can refer to.
Then hold your panel up to the shelf and hold up a hook and figure out where you'd like to screw the hook in. Mine look like this:
You should probably pre-drill your holes, but I got lazy and didn't so I kinda split one a tiny bit. Oops! The others went in with no problems.
Place all four hooks and put up your panel. If you want a book, just slide the grommet out of the hook and then replace it. If you don't want hooks, consider sticky velcro, or even tension rods as an alternative.
No more book eating in my house.
Credit goes to my friend Abby for the idea. I think she has something similar at her house!
Thursday, October 31, 2013
Halloween Class Treats
I volunteered to help in my daughter's 1st grade classroom this year (not sure what I was thinking with a 4 year old and an 8 month old at home), so they called me up for the Halloween party.
I was in charge of treats this year, so I scoured pinterest and here's what they're having!
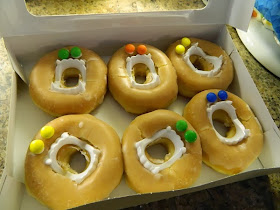
VAMPIRE DONUTS
donuts+ vampire teeth + M&Ms + royal icing (to keep the eyes on)
MUMMY DRINKS
Little Hug Fruit Barrels + crepe paper streamers + hot glue + googly eyes
I was in charge of treats this year, so I scoured pinterest and here's what they're having!
VAMPIRE DONUTS
donuts+ vampire teeth + M&Ms + royal icing (to keep the eyes on)
MUMMY DRINKS
Little Hug Fruit Barrels + crepe paper streamers + hot glue + googly eyes
Friday, October 25, 2013
Link and Zelda Kids Costumes
I've loved the Zelda games since I was a little kid, and my daughter has started playing the newest one, so we chose a Zelda theme for Halloween this year. It took a lot of convincing for my son to be link. I've been working on psyching him up for it since August. What finally convinced him was the shield (which he calls a fire shield? I think he thinks the Hylian Crest is fire) and the potion bottle. Spiderman doesn't have those!! haha
I made these without a pattern, and I thought about making one and posting it here, but it's just way too much work with a baby in the house, so just pictures will have to do.
The Link shield comes from this youtube video. I used corrugated cardboard, acrylic paint, flat marbles, and craft foam instead of the things they recommend.
The best part is that our baby is a Zelda Cucco!
Friday, August 16, 2013
Ear Bud Pouch
My kid needed earbuds this year for school, and I didn't want to just throw them in her backpack with everything else and have them get tangled or broken. I went searching and found an adorable tutorial for a circle earbud pouch at Dog Under My Desk (link here).
I used fusible fleece inside, which I don't actually recommend because it was too thick to topstitch, but it's what I had around.
24 Crayon Roll
My daughter's school required boxes of 24 crayons, so I searched all over for a 24 crayon holding crayon roll. I couldn't find a tutorial for one I liked, so pattern shmattern, right? I made my own.
I did not make a tutorial, but I will tell you that the pockets are 1 3/4 inch wide, if that helps you make your own.
I made a Bapron!
I've made a few of them now, but I just loved these colors so I took a picture. The bapron tutorial and pattern is available at here from Craftiness is Not Optional.
I just added a pocket (I like having them to catch crumbs) and I backed it with rip-stop nylon instead of flannel to give it some water resistance. It fits well on my chubby 6 month old. I bet it will fit for a while now as she starts to grow up more than out during the crawling age.
Saturday, June 29, 2013
I Love You in Dinosaur
Rawr Means I Love You In Dinosaur!
I have always loved this saying, so I finally spent the time to make a shirt for my son with a freezer paper stencil. He has been begging me for a "sharp tooth" t-shirt.
If you'd like to make one, I've saved my template. The dinosaur picture was just from a google image search of "dinosaur silhouette." You can do the same and switch it out for a different dinosaur easily. Click on the image to download the stencil pdf.
The easiest thing to do is to cut a piece of freezer paper to the size of your printer's paper and then print the image directly on the non-shiny side of freezer paper. Then use an Xacto knife to carefully cut out the image (make sure to save all the tiny pieces like the insides of the "e" "a" "o" "r" and "d'", iron it onto your shirt, and paint away with fabric paint. There are lots of freezer paper stencil tutorials online if you need better instructions.
Tuesday, April 30, 2013
Baby Blessing Gown
My oldest daughter wore the gown I was blessed in for her baby blessing, and I plan to hand it down to her for her own children. For my younger daughter I made her a gown so she'll have something to hand down to her own children if she would like to.
Here's my baby girl wearing the blessing gown I made her. Unfortunately at the time of the photo she wasn't exactly happy...
The body fabric is cotton knit, and the ruffles are white and off-white satin and polyester lace.
I used this pattern from Sew Much Ado (I purchased the full pattern because I like it so much) and this tutorial for a ruffle dress from Kojo Designs and meshed the two together to make my daughter's blessing gown. I don't like unfinished edges, so I used my serger to make rolled hems on the edges of the satin ruffles, and I used this tutorial for gathering on a Brother serger to make the ruffling go so much faster. I also used this tutorial on Make It & Love It to make the flower on her headband out of left over lace.
Wednesday, February 27, 2013
Look What I Made!
If you've been wondering what I've been up to lately, I've been suffering from pregnancy ADD (or so I call it). In the end of my pregnancies I just can't focus on anything. I can't read books. I can't do a project that takes more than an hour. But it was worth it. Here's our latest little one!
Thanks so much to my friend Staci who took some beautiful newborn pics for us.
Here's her facebook page if you'd like to see more of her work.