

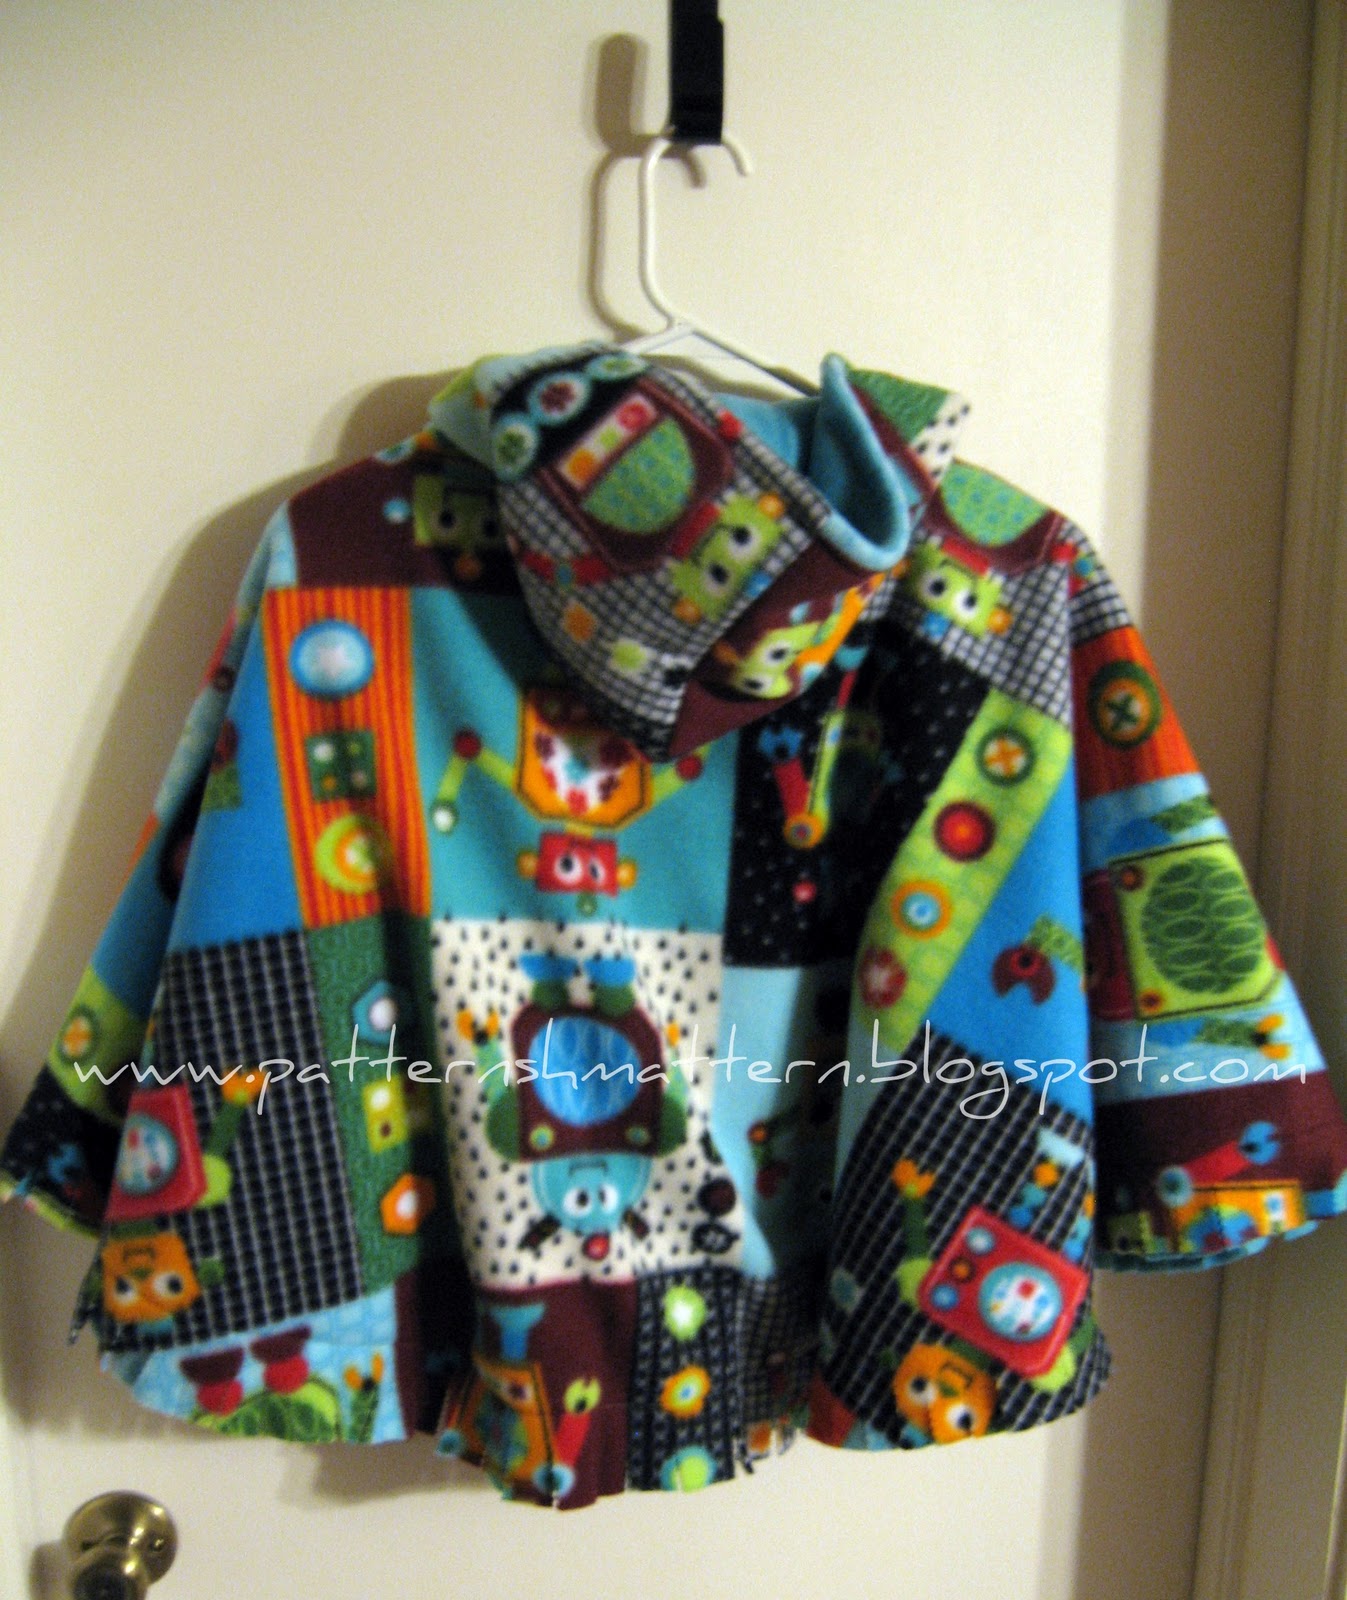
My son is almost 18 mos, and he wears between a size 18 mos and 24 mos. This poncho tutorial is generous for that size and I'm sure it will still fit him next year since it is down to past his knees. It's fairly easy to adjust for a larger or smaller child. I like longer ponchos for car seat use because it covers their entire legs when they are in the car. (Update: It's 2013 and my son is now four years old and he still wears this same poncho!) You can measure to the ends of their arms, for example, for a shorter poncho.
Step 1: Measure child from their neck to where you want the edge of your poncho to be. Multiply that by 2 and that's how much fabric to buy. If you want a hood on your poncho, it's easiest to add at least a few more inches to your yardage when you buy. I bought 1 1/4 yards of two different pieces of fleece (for the two layers) to make a 23 inch poncho and had enough left to make a hood.
Step 2: You're going to cut your fleece into a circle. The easiest way to do this is to fold both pieces of fleece (separately) edge to edge twice, so you're folding it in quarters. Measure out, from the folded corner, the length from step 1 (from your child's neck to where you want the hem to be). My measurement was 23 inches. Mark your quarter circle out with pins or draw it if you have something that writes on fleece.


Step 3: Making the hood. I had enough fabric left over after cutting the circle to make a hood. To know what size to make, you can measure a hood that you already have, or measure your child's head. The measurement I decided on was 12 inches tall and 10 inches wide. Cut one hood piece from each of your fabrics so the finished hood will have two layers. Since my robot fleece was one-directional, I cut two pieces (10"x12") of robot fleece and sewed the 10 inch sides together with a 1/4 inch seam so the robots would both be upright on each side of the head. The blue fleece only needed one piece that was 10" x 23 1/2".

You need to fold and sew up one of the sides of both hood pieces. If your pieces are 10" x 23 1/2" fold them each in half the short way and sew up one of the 12" sides. Round the corner like this if you don't want a pointy hood.


Turn one hood inside out and place it inside the other hood, right sides together. Line up the edges of the fabric and sew around the front of the hood that would be around your child's face.

Turn the hood right side out through the open neck and top stitch (pictured above) around the face. I pinned before top stitching just to keep the seam as even as I could.

You may want to baste stitch the raw neck edge to make the next step easier.
Now your hood is ready.
Step 4: Making the hole for the hood. Open up your circles 1/2 way and place one inside the other. Mark the center with a pin. Lay out your hood on the edge how you would like it to look (I recommend placing the edges of the hood just a few inches apart) and mark the placement of the edges of the hood on your circle with pins.


Step 5: Adding the hood to the poncho.
Sandwich the raw edges of your hood between the two pieces of fleece all the way around the hole. Fold down the raw fleece edges on the poncho neck as you go around and pin.


Step 6: Making the fringe edge. Sew around your circle two inches from the edge. An easy way to make sure your seam allowance is always two inches is to use masking or other tape and place it at the 2 inch mark on your machine. Keep the edge of your fabric on this mark as you sew.


You're finished, now try it out in the car. Congratulations on making your child safer and warmer!

Some people also like to cut a line straight up the back of the poncho to make it easier to put the child in the car seat. You could use velcro or snaps in the back to keep it closed when not in the car seat. I opted not to for now to keep it really warm since my kid is still rear-facing. The back of the poncho will be able to drape over his car seat. When we turn him around I'll probably cut a slit in the back. You can also experiment with pockets or arm slits.
I'm not the best at taking the right pictures, so feel free to contact me if you have any questions as you go along. If you make one, share a photo on the Pattern Shmattern Flickr group.
***This tutorial is for personal, non-commercial use only. Reproduction is prohibited. Making these ponchos using my pattern or tutorial and selling them is prohibited without written permission from the author.***
What a fantastic tutorial! Thank you so much! I cannot wait to make one!
ReplyDeleteThis is exactly what I need. My kids are always yelling about their car seat straps being too snug when they have on a jacket, but I do not dare loosen them!! This is just what I was looking for. Thanks a bunch!!
ReplyDeleteThanks for the tutorial. You did a good job! I just finished one for my granddaughter and it worked out fine. I did chose to finish the bottom edge by sewing all around it with the right sides together before I cut the opening for the hood. This allowed me to turn it right side out before I proceeded to put in the hood. Even though I am experienced with sewing, I did struggle with putting in the hood and did have to make a couple of corrections to get it right, but it is nice that this is completely reversible now! Thanks again!
ReplyDeleteYay! Fleece is on sale at Hancock Fabrics this month! Thanks so much, this will be a fun and useful project. :-)
ReplyDeleteThank you for this tutorial...I have been searching for an easy pattern for my sister in laws baby due in Feb..As the mother of twins I struggled with this problem also and payed a lot for stroller versions of this ( more like a sleeping bag style) worked great but this would have been easier and quicker...I started looking for a pattern bc a mom at our tumbling class had her baby in one..She bought it at a craft fair..when I looked up that site, she had trademarked it and was selling them for 70.00! Unbeleivable! Thank you so much for a fun project!
ReplyDeleteWow 70.00$$$???
DeleteHmm. I make them completely customized on Etsy for less than that. Geesh. I hope they're made with unicorn fur ;)
still making them? ship to Ontario?
DeleteSo on 24" it comes to 1 1/4 yd each how do you figure yardage I need a 32" and 40"?
DeleteJust made this for my 6-month old (in preparation for our upcoming Minnesnowta winter). I really love the idea! I am just learning how to sew and I'm teaching myself, so I made some mistakes along the way. I am overall pleased with how this turned out, but I would change one thing: When sewing on the hood and the neckline, sew it with the "outside" side facing up - all those layers of fleece were tricky to work with, and they slipped in a few places. My inside layer looks great because I could control it, but the outside leaves something to be desired. Perhaps it was my fabric, though, that added the extra challenge - I used "ultra cuddle" fleece from Joann Fabrics that is a bit fluffier and softer, perhaps regular fleece holds and pins better. All in all, a great project. Thanks for sharing this!
ReplyDeleteextra cute! I'm trying this tomorrow.
ReplyDeleteWhere do you buy your fabric? It's extra cute.
I think the robot fleece came from Walmart and the pirate fabric is from Joann.
DeleteThanks for the tutorial! I made them for my two boys, am going to make one for my niece, and will probably end up making some for friends. I found it much easier to make the slit for the neck/hood using a rotary cutter to cut through the two layers of fleece.
ReplyDeleteI'm going to attempt this..its getting cold out. When measuring for the fabric though, you measure and multiply by 2. Does this give you how much fabric you need in total or of each pattern?
ReplyDeleteOf each pattern, so by 4 if you're going with one color only.
DeleteGoing to try to make this. Did you make a 23" poncho with this tutorial or a 46". It's kind of confusing the way it reads.
ReplyDeleteI made this and it turned out pretty nicely. Instead of a straight hole for the hood, I opted for a circle which I felt was easier to sew. I also opted to use a zig-zag stitch when attaching the hood which eliminated the need to tuck in the raw edges which was proving cumbersome and time consuming. The zig-zag gave it a nice decorative touch and the raw edges of the fleece don't even show. : ) Thanks for the tut!
DeleteIt's 23 inches from neck to hem, so it's 46 if you open it up and measure the diameter. Hope that helps!
DeleteI was looking for alternatives to a winter coat in the carseat and came upon your instructions. I just finished making the poncho for my daughter and it came out great. I consider myself an intermediate level sewer and I was easily able to make this. The hood was a bit daunting, but surprisingly there was less blood, sweat, and tears shed than I thought there would be. Thanks so much for the instructions!
ReplyDeleteI just finished one of the poncho's. You're right the hood is tricky. I'm making 2 of them, so hopefully the second one will be a bit easier. I also put a 6" zipper in the front. Great project and didn't turn out too bad for an occasional sewer. Heather D......how did you attach the hood with zigzag? Can you explain further?
ReplyDeleteThanks so much for the tutorial - just finished creating one for my third and youngest for this winter :-D I posted a few pictures to the Flickr group!
ReplyDeleteI'm doing these a little different, I am cutting a circle for the head and sandwiching the hood between the two layers, right sides together, and sewing the neckhole basically inside out, then flipping the layers into position. Not sure how to better describe it. It's quite simple when done this way. I have found a large oatmeal container lid tracing makes an ideal sized opening. It leaves a little over an inch of non-hooded neck in front. However - I always find in the end no matter how obsessively I pin, my two layers somehow don't end up the same length. I have to sort of hold the poncho up by the hood and fluff the layers straight, then pin, then trim, then I just do a simple straight stretch stitch close to the edge to connect the layers. I have tried experimenting with a totally neat sewn edge version which required me to cut open the front and I then put a zipper in (I don't think it was worth the extra step as my daughter now wants one without a zipper) but even then sewing everything before the final flip you can tell the bottom edges somehow ended up not quite the same length.
ReplyDeleteAre you trimming the edges even before the fringe step? It is a mystery why my edges keep ending up not quite the same.
I haven't had much trouble getting the edges to align correctly, but a fringe hem is also very forgiving if it's not perfectly straight.
DeleteI was brainstorming on making my son's and was thinking I would sew the hood in the same way. Cut the hole, "open" the layers of the poncho and stick the hood in between the layers, sew. Then same for the front half. Glad to see that someone else has used this method before I try it! I like not having any raw edges, and having everything tucked in neatly.
DeleteI plan to hem the outer edges together and then tuck them to the inside (between layers) and topstitch for neatness.
I think that's a lot like the alternate method I have linked. I hope it works out for you! Anything to make it easier.
DeleteGoing to make a new poncho today and realize I didn't write down what seam allowance I used to make the neck hole - thought, hey, didn't I comment somewhere about how I did the neck hole?? Why, yes I did! But I didn't mention the seam allowance. At any rate, I solved my uneven edges issue - I used a big half circle of cardboard on a fold to make my circles and it turned out my half circle was not exactly perfect all around. I made a better template to deal with that.
DeleteI would like to make a carseat poncho how do i get permission to print your tutorial
ReplyDeleteIf you want to print it out for your own use so you can make your own poncho, that's fine with me. Just don't go publish it anywhere.
Deletewon't do that can I print it now keithnmike@msn.com
ReplyDeleteSure you can print this blog post for personal use.
DeleteHi, I am going to make this with fleece lined with flannel for my 18 month old Grandson. Should I prewash the fabrics first before I cut and assemble the pattern? Thank you.
ReplyDeleteI would definitely wash and dry the flannel before cutting and sewing, since that will shrink a bit. The fleece shouldn't shrink, so you can wash that or not, it shouldn't matter.
DeleteSounds like a good idea. I'd love to see a picture when you're done. My son still wears his from time to time and he just turned 5!
Hi! I am making this as a gift for someone's child who does not live close to me. I can't ask mom to measure since it's a surprise. The child is in 18 month clothes. Should I be fine using the measurements you used in the tutorial? Thanks! I plan on sewing this up in one afternoon!
ReplyDeleteIt should be fine. The only thing you might want to make smaller is the hood (just if it is your preference) because I made it pretty big. You might want to make it maybe an inch smaller, or you could just make sure the front edges of the hood where it connects to the poncho are closer together than I did to make it a little more snug.
DeleteThx for the tutorial. Going to the fabric store today. Now is it 1 1/4 yards of each pattern or 1 1/4 total in fabric?
ReplyDelete1 1/4 yards each for a total of 2 1/2 yards.
Deleteso quick and easy, made one for my ten week old during one of his short naps.
ReplyDeleteI made two of these for my kids last year and am making a new one for my daughter this year, with fleece and flannel. Thanks for the great tutorial!
ReplyDeleteTotally making on for hubby so he can snuggle up inside and play videogames..its like a wearable blanket!
ReplyDeleteThanks for the tutorial! I just finished one for my 16-month-old daughter. I added a zipper in the front so it would be easier to access her straps and get her buckled in. The zipper made the project a little more challenging, but I'm happy with how it turned out.
ReplyDeleteI'm glad to hear it!
DeleteI absolutely love this idea for my granddaughter. Thx so much for the detailed instructions.
ReplyDeleteThis was a great Poncho tutorial. I have made 3 now for all the grandkids. After making the first as per the tutorial, I decided with the 2nd and 3rd, to make two changes. I wanted a closed hem at the bottom and to add a zipper. Putting in zippers allowed me to better control the size of the neckline. Based on this, I cut my outer layer (blanket cloth) to the desired sized circle based on the age of the child, and the inner layer (fleece). I used a CD to cut the neck openings. I then cut a straight line from the neck to the outer edge on both the outer and lining fabrics of the poncho. I added the zipper to the outer fabric, and machine sewed the remaining seam closed. On the lining, I sewed a seam the same length as the seam corresponding with the outer layer, leaving it open where it matched the zipper length. I then sewed the outer and lining bottom edges together, trimming excess where necessary, and notching material so that the round edges laid flat. After flipping and ironing, I top-stitched these edges. I then folded in and pinned the open part of the cut edge of the lining to the inside of the zipper edges, and machine stitched these into place. I hand basted the both layers of the hood (to gather), to ease the hood into place on the poncho; then pinned and machine sewed it into place, in between the outer layer and lining of the poncho body. I then folded a seam allowance and hand sewed the lining of the poncho to the lining of the hood. Once completed, I finished by top-stitching with the machine along the whole neck opening. Done and done!!! Cute as buttons!!
ReplyDeleteI'm at the step where I am pinning the hood in between the layers of fabric. In my case, I have a square blanket, made from two pieces that I sewed together, turned right side out, and topstitched. The square is folded so that when worn, it makes a triangle if the child holds their arms out (point of the triangle at the bottom). Hope that makes sense.
ReplyDeleteI'm having problems with the hood. As per the instructions, I cut a slit through both layers of fabric,sandwiched the hood between, and then went around tucking the fabric edges under & pinning. It works OK on across the back of the hood & across the front, but where it crosses over the shoulders it's impossible to get the fabric to lie flat. The ends of the slits in the inner & outer fabric simply won't turn under to the same depth as the rest of the slit without bunching up, a lot. Has anyone else had this problem? Would it work better if I cut an oval/circle instead of the slit?
I'm a bit afraid to try cutting an oval/circle now... will the hole be too big if I had already cut a slit wide enough for the hood?
I know it says 24" is 1 1/2 yd each flannel. How do u figure out ydage for a 32 " and 40" never made before so was just wondering for my. Freinds kids.
ReplyDeleteGood job on an easy to follow tutorial. Thanks for sharing!
ReplyDeleteI have made 2 of these now and my mom made another. 1.5 yards of each fabric was enough for a 24" poncho for my 4 year old. It hits just below his fingers. The hood I did 9"x13" and it was perfect, if not a little oversized.
ReplyDeleteI so appreciate this pattern! I've made four now for my kids and my nieces!
ReplyDeleteThank you so much for the pattern and the tutorial. It took me a minute to figure out how to cut the circle but I finished it and it looks great. Muchly appreciated.
ReplyDeleteHow do I find and open the video regarding attaching the hood
ReplyDeleteJust click on the words. They are a link, but it isn't a video. It's a typed tutorial.
DeleteBeautiful poncho! My daughter has similar ones, but made of wool. I love putting them on when it gets a little chilly.
ReplyDelete