Thursday, December 16, 2010

Reversible Car Seat Poncho Tutorial

 
I've been reading a lot about car seat safety- when to turn the seat around (not until at least 2 is the new recommendation) and what to do about bulky winter coats.  It's not safe to buckle your child into their car seat while wearing a bulky winter coat.  We're visiting family in the great northern state of Minnesota soon, which was -20 degrees this week.  The recommended solution of just taking off your kid's coat in the car and using a blanket just won't work when it's that cold.  The solution? A Car Seat Poncho.  A poncho allows you to thread the car seat straps underneath while still keeping your kid safe and warm.

Here's how I made mine.

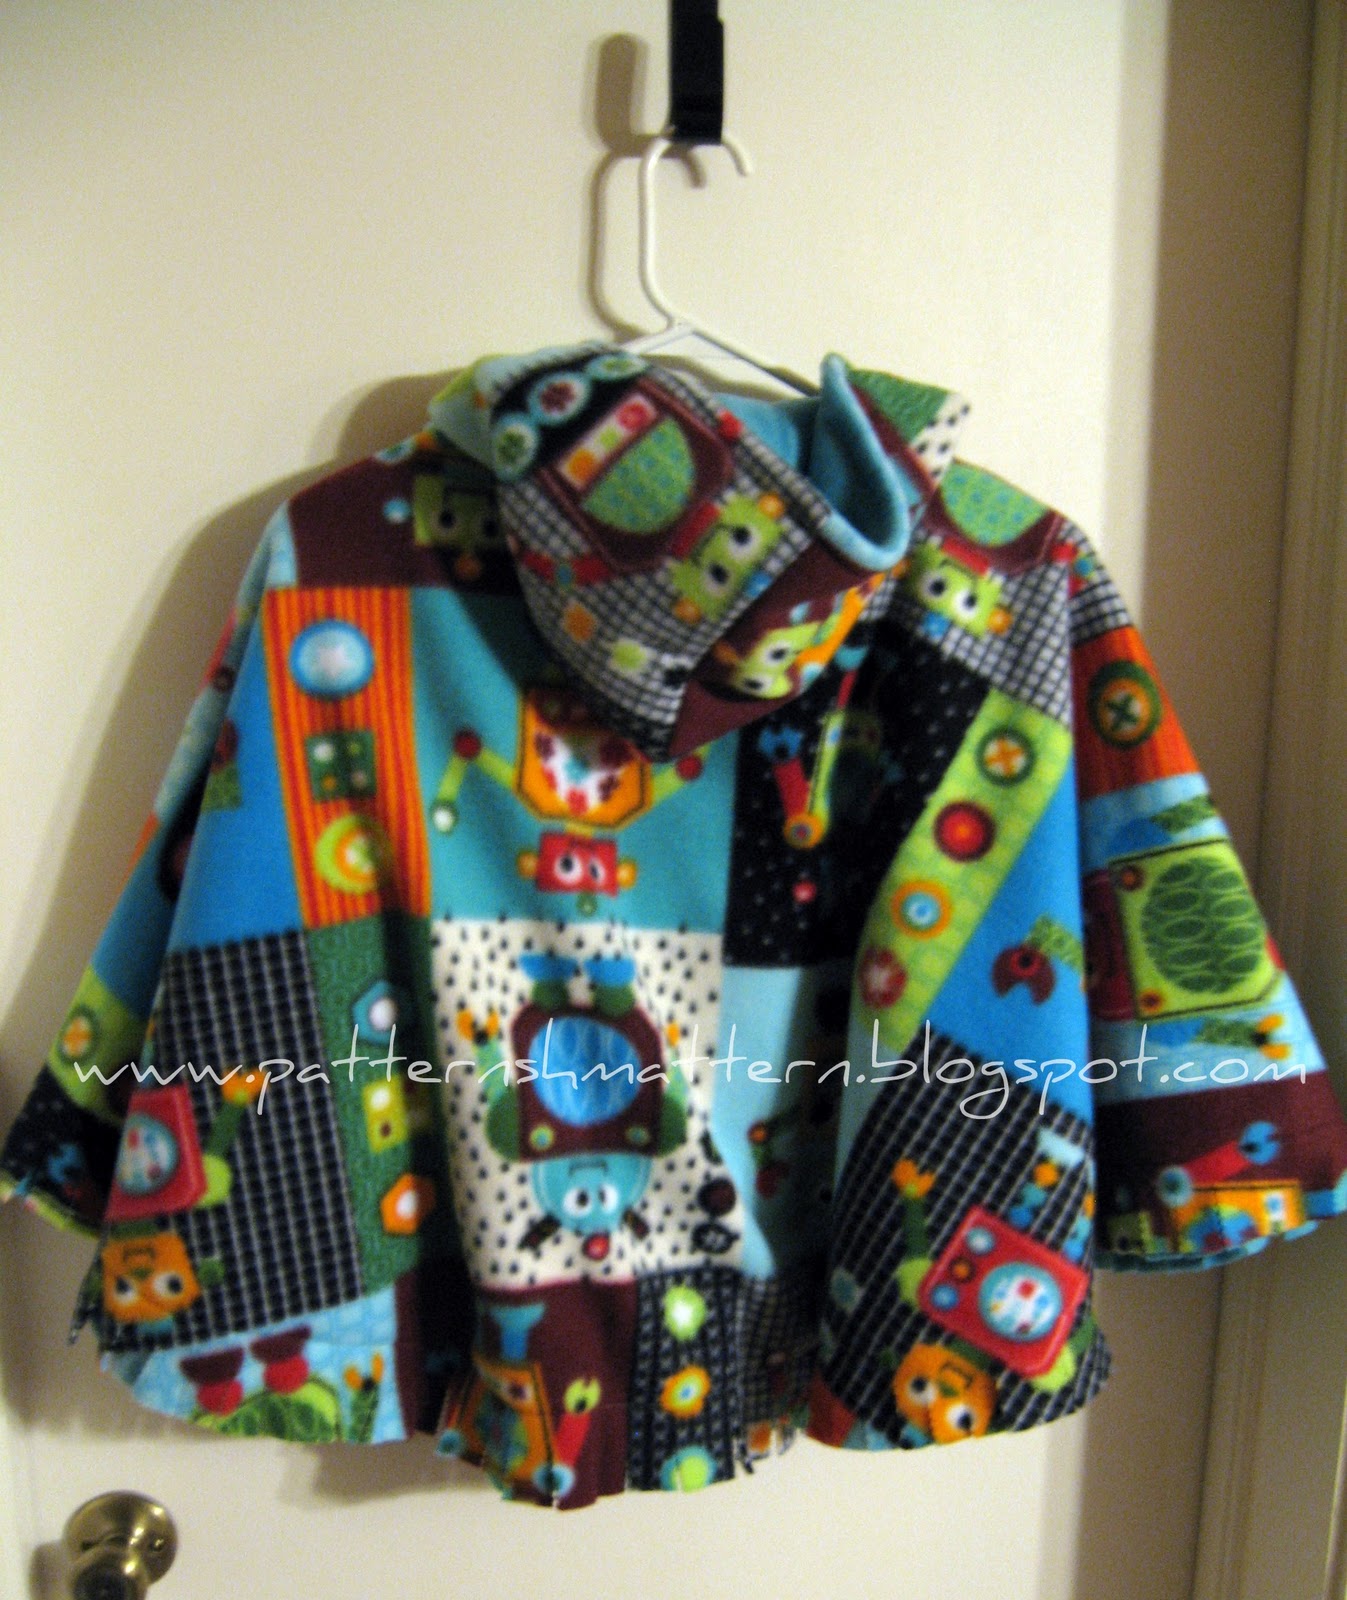
My son is almost 18 mos, and he wears between a size 18 mos and 24 mos. This poncho tutorial is generous for that size and I'm sure it will still fit him next year since it is down to past his knees.  It's fairly easy to adjust for a larger or smaller child.  I like longer ponchos for car seat use because it covers their entire legs when they are in the car. (Update: It's 2013 and my son is now four years old and he still wears this same poncho!)  You can measure to the ends of their arms, for example, for a shorter poncho.

Step 1: Measure child from their neck to where you want the edge of your poncho to be.  Multiply that by 2 and that's how much fabric to buy.  If you want a hood on your poncho, it's easiest to add at least a few more inches to your yardage when you buy.  I bought 1 1/4 yards of two different pieces of fleece (for the two layers) to make a 23 inch poncho and had enough left to make a hood.

Step 2: You're going to cut your fleece into a circle.  The easiest way to do this is to fold both pieces of fleece (separately) edge to edge twice, so you're folding it in quarters.  Measure out, from the folded corner, the length from step 1 (from your child's neck to where you want the hem to be).  My measurement was 23 inches.  Mark your quarter circle out with pins or draw it if you have something that writes on fleece.

 Cut along your pins:
Step 3: Making the hood.  I had enough fabric left over after cutting the circle to make a hood.  To know what size to make, you can measure a hood that you already have, or measure your child's head.  The measurement I decided on was 12 inches tall and 10 inches wide.  Cut one hood piece from each of your fabrics so the finished hood will have two layers.  Since my robot fleece was one-directional, I cut two pieces (10"x12") of robot fleece and sewed the 10 inch sides together with a 1/4 inch seam so the robots would both be upright on each side of the head.  The blue fleece only needed one piece that was 10" x 23 1/2".
 
You need to fold and sew up one of the sides of both hood pieces.  If your pieces are 10" x 23 1/2" fold them each in half the short way and sew up one of the 12" sides.  Round the corner like this if you don't want a pointy hood.

Turn one hood inside out and place it inside the other hood, right sides together.  Line up the edges of the fabric and sew around the front of the hood that would be around your child's face.

Turn the hood right side out through the open neck and top stitch (pictured above) around the face.  I pinned before top stitching just to keep the seam as even as I could.

You may want to baste stitch the raw neck edge to make the next step easier. 

Now your hood is ready.

Step 4: Making the hole for the hood.  Open up your circles 1/2 way and place one inside the other.  Mark the center with a pin.  Lay out your hood on the edge how you would like it to look (I recommend placing the edges of the hood just a few inches apart) and mark the placement of the edges of the hood on your circle with pins.


 Then cut a line through both layers of fleece the length between your pins.
 After I cut the line (mine was about 11 inches) I slightly rounded the lower edge of the hole that will be facing the front of the poncho.  This is optional.
Step 5: Adding the hood to the poncho.
Sandwich the raw edges of your hood between the two pieces of fleece all the way around the hole.  Fold down the raw fleece edges on the poncho neck as you go around and pin.

 Carefully sew the hood on all around the neckline.  This was the most difficult part for me.
 Now the hood is done!  You should celebrate.  I did.  If sewing the hood on this way is too difficult, try my tutorial on another way to attach the hood, linked here.

Step 6: Making the fringe edge.  Sew around your circle two inches from the edge.  An easy way to make sure your seam allowance is always two inches is to use masking or other tape and place it at the 2 inch mark on your machine.  Keep the edge of your fabric on this mark as you sew.
 Lastly, take some pinking shears and cut a fringe all the way around, making sure to not cut all the way up to the 2 inch seam you just sewed.  I think my fringes are about 3/4 of an inch wide.
You're finished, now try it out in the car.  Congratulations on making your child safer and warmer!
Some people also like to cut a line straight up the back of the poncho to make it easier to put the child in the car seat.  You could use velcro or snaps in the back to keep it closed when not in the car seat.  I opted not to for now to keep it really warm since my kid is still rear-facing.  The back of the poncho will be able to drape over his car seat.  When we turn him around I'll probably cut a slit in the back.  You can also experiment with pockets or arm slits.

I'm not the best at taking the right pictures, so feel free to contact me if you have any questions as you go along. If you make one, share a photo on the Pattern Shmattern Flickr group.
***This tutorial is for personal, non-commercial use only.  Reproduction is prohibited. Making these ponchos using my pattern or tutorial and selling them is prohibited without written permission from the author.***  

Wednesday, December 15, 2010

Twin Sheet Teepee

It was time to retire the refrigerator box playhouse.  The kids had ripped out the curtains and one of the windows.  My daughter spilled her brother's sippy cup in there, used a toy sword to make some holes in it, and pulled the roof down on the side.  It lasted a good 9 months, which I think is kind of impressive. 

So I started looking for a kind of replacement- something inexpensive and durable.  I was browsing a craft thread on a parenting forum and found this awesome tutorial from Obsessively Stitching.  The best part is that the material needed is just a twin flat sheet, only 4 dollars at Walmart.

 Here's the finished teepee. 

I actually made this owl because I got some sewing machine grease on my fabric, so I needed to cover it up.  I have a thing for owls, and it matches the new playroom curtains I made.
  
 My daughter saw me making it last night, and it was the first thing she asked about this morning.  She ran into the playroom and declared, "Mom can have the computer.  I'm playing in my TENT!"  Then she ran around the outside of it and said, "Dad, there's no door."  Haha. He showed her how to open the door flap and she promptly filled it with toys.  I declare it a success.

A couple of things I noticed when making this-
- I had to make the pole sleeves closer to 2 inches instead of 1 1/2.  I used 3/4 inch PVC pipe as instructed, so I'm not sure why I had to sew bigger sleeves.
-I spent a good 15 minutes staring at the pattern instructions for the door piece (step 2) before I realized the right illustration is zoomed in.  I was so confused about where I should be sewing "along the upper left edge," but then I figured it out.  It's just at the very top right of the door piece.

This is actually a really simple project.  I really liked it.  Total time start to finish was about 4 hours.

Monday, December 13, 2010

Hedgehog

This is what I made today on a whim.  I've had this book, Wild and Wonderful Fleece Animals, since last Christmas, but I hadn't tried any of the patterns yet.  I used up some leftover fleece I've had sitting around for a while.
 It was pretty simple to make- just 3 body pieces and 3 "spike" pieces.  My son hasn't put him down since.

Friday, December 10, 2010

Red Fabric Flower Hair Clip

These hair clips are so easy to make. They took about 15 minutes. All you need is
-any synthetic material.  This is some kind of polyester satin I found in a remnant bin.
-a small amount of felt or other non-fraying material
-a couple of beads
-hair clips
-non-slip shelf liner.

Cut four circles of increasing size for each clip you want to make.  I like the look of rough hand cut circles, but you could trace them to make them exact.  Using a lighter or candle, melt the edges of the circles.  Be careful not to catch them on fire .  You can also warm up some of the center material to give it a little more wavy/wrinkle look.  Stack the circles and hand sew the bead in the center. 

On the back, attach the clip by hot gluing a small circle of felt to the flower and the clip.  Glue over the knots on the back of the flower where you sewed on the bead.  I also like to glue on a piece of non-slip shelf liner so the clip will stay in hair better.

Sorry the pictures aren't the greatest.  There was no natural light in my crafting room when I was working on these this evening.

Wednesday, December 8, 2010

ModPodge Canvas Bird

I picked up some Mod Podge at the store so I could work on using some of my scrapbook paper I picked up on my last trip into town.  I have two bird silhouette pictures in my bedroom that I purchased, so I thought I'd make another one on a canvas to put on the wall.

It's my 2nd only ever decoupage project, so please ignore the wrinkles.  I like the way it turned out.  The bird silhouette can be downloaded here.  I think it's a Scissor-tailed Flycatcher, for those who are interested in birds.  For the twig I used paper that had printed scribbled writing on it.  I like how it made the twig look like birch bark.

Tuesday, December 7, 2010

Pumpkin Soup

Wondering what to do with all those cans of pumpkin you bought up on sale after Thanksgiving?  I bought a bunch this year.  I love pumpkin pie all year round, and when I wanted some for my birthday in June last year, the grocery store didn't have any.  I decided to try out a pumpkin soup.


Here's a great recipe for that came out of a Better Homes and Gardens magazine and then I tweaked it a bit.

Ingredients:
3- medium carrots, peeled and sliced
2- Tbsp margarine
1- medium onion, diced
1- stalk celery, diced
1- clove of garlic, minced
2-15 oz cans of pureed pumpkin (make sure it's not the pie mix kind, just pure pumpkin)
1- 32 oz box of beef broth
1/2 cup whole milk
1/2 cup water
a squirt of syrup (I didn't have maple syrup so I used non-maple pancake syrup)
1/2 tsp ginger
1/2 tsp cinnamon
1/4 tsp ground cloves
salt to taste

Cook sliced carrots in a large stock pot in the margarine over med heat for 2 minutes.  Add the diced onion, celery, and garlic and cook 8-10 more minutes until vegetables are tender.
Stir in the pumpkin, broth, milk, water, syrup, and spices, and heat through.  Salt to taste.

The photo in the magazine is prettier than mine.  This makes a yummy fall/winter side dish.

Wednesday, December 1, 2010

Homemade Hand Warmers


These are so easy that you don't need a tutorial. Just cut out 5 inch squares of fabric (these are 100% cotton flannel) and sew them like you would a bean bag. Instead of beans, fill them with rice. When you need to warm up your hands (driving to work in the morning or shoveling snow, etc.) Just pop them in the microwave for a minute. Toss them into the pockets of your coat and use them to warm up your hands.

These are great inexpensive stocking stuffers.

Friday, November 26, 2010

Christmas Candy Advent

We love our Christmas Countdown at our house because it's made of candy. Who doesn't love Christmas candy? My mom made me this Santa hook years ago and we use it every year. Think of it as candy portion control.
This Christmas countdown is simple to make.
All you need is:
-Some kind of hook
-About 7 feet of plastic wrap (red or green plastic wrap also looks nice)
-Enough candy for everyone in your family to have one piece each day, so 75 pieces for us. Two 8 oz bags of Hershey's kisses was enough.
-Colorful ribbon cut in about 7 inch pieces
Just lay our your plastic wrap and place the candies on it, one day at a time. Separate each day with a ribbon tie.


Keep on going until you have 25 days, or in our case 29 since I don't like to wait until December to start.

Just cut below the candy each day and eat your treats. Christmas will be here before you know it.

Friday, November 19, 2010

Shutterfly


Did you know if I submit a blog post about Shutterfly (an online photo cards and gifts store) that I can get free cards!? That is why I love Shutterfly. They have great deals all the time. This year for Mother's Day I made a really pretty card with pictures of my kids for my mom and mother-in-law. It turned out great and it was so inexpensive because they had a great deal where you get 3 cards free and only pay for shipping, which is perfect for a holiday like Mother's Day. My mom loved it. She took it to church and showed all of her friends.


This year I plan to use my free cards deal to make personalized Christmas cards for all of my family and friends. If you haven't tried Shutterfly, you should check it out. Keep an eye out for coupon codes and you can get some great deals on really beautiful and high-quality cards.

Persimmon Muffins


I was walking through the grocery store and I overheard a man and his son discussing something in the produce section. "What is THAT?" "It looks like some kind of tomato." "Maybe it's just an unripe tomato or... something..."

I didn't tell them, but they are missing out on one of the great fruits of fall- the persimmon.
Persimmons are a little bit tricky. I've heard people say, "They dry out your mouth and taste awful." That's only if you eat them unripe. Unripe persimmons are full of tannins that make them astringent and bitter tasting. The variety sold in the Walmart in my town is Hachiya, which is particularly astringent until ripe, but is more sweet when it is ready to eat than some other varieties. Make sure you know which variety you have and that it is ripe before trying this recipe. Wikipedia is a good resource.
*My Hachiya persimmons were not ripe until you can easily squish your fingers into the skin and the fruit is very soft. Other kinds, especially the pumpkin shaped ones are more crisp when ripe. If you're unsure, just cut a small slice out and try it. The flesh and skin is edible. You will easily be able to tell if it's ready. If it's not ripe you're going to want to spit it out because it's really gross. Have a trash can ready.
I decided to use my persimmons this year in some baking, and I came up with a muffin recipe that I really like. It makes 6 muffins.
Ingredients:
1 ripe persimmon*
1 egg
1/4 cup applesauce
1/2 cup sugar
1 Tablespoon canola oil
3/4 teaspoon baking powder
1/4 teaspoon baking soda
1/8 teaspoon cinnamon
1/8 teaspoon ground nutmeg
1 cup all-purpose flour
Peel your persimmon and cut off the green top. Remove the soft core.
Mash or blend up the persimmon in your mixer. Add the egg, applesauce, oil, and sugar and mix. Add the baking powder, baking soda, cinnamon, and nutmeg and blend well. Then add the flour and stir until moist.
Spoon into a greased muffin tin. Grease it really well.
Bake at 350 F for 16 minutes.
Enjoy!

Wednesday, November 17, 2010

Thanksgiving Hair Bow

I thought this hairbow tutorial found on www.girlythingsbows.com was adorable, so I made one myself. I made a few adjustments. Instead of the suggested 3/8" grosgrain ribbon, I used 3/16" "loopy ribbon" for the feathers and 1/4" polyester ribbon for the body. I added some extra purple feathers as well. The beak is a triangle piece from a sheet of craft foam, and I added a couple of tiny buttons for the eyes.
Cut out a small piece of non-adhesive shelf liner that you buy in rolls at any store like Walmart. Glue that to the inside of your alligator clip and the hairbow will stay in all day.

Thursday, November 11, 2010

Christmas Diaper

We started cloth diapering when my oldest daughter was one. I went out to the store and picked up some Gerber prefold diapers and plastic pants. My mother had told me stories of trying cloth with one of my brothers. They leaked all the time, she said, and were kind of a mess. After trying out the Gerber diapers and covers, I had to agree. It was pretty awful. They didn't absorb really well and they were kind of a pain. I wondered how anyone could stick with it, but I loved saving the money. Did you know that the average cost of disposables for a child is $1600.00 for two years? My daughter wasn't potty trained until 3, so add on another 800 dollars I could save. So I did some google searching and found the world of cute cloth diapering. Diapers have come a long way from Gerber prefolds, let me tell ya.

Most of our current diaper stash is prefolds (higher-quality GreenMountainDiapers prefolds) and cute Thirsties brand covers. I have, however, splurged once on a cute designer diaper sold on hyenacart.com.

After studying how the designer diaper was made, I figured it wouldn't be really hard to make my own. Here's my very first attempt at a homemade cloth diaper. I had some leftover flannel from making these ornaments, and I had some terrycloth laying around from other projects, so I thought why not make a diaper with it?
I laid out the diaper that I had purchased and traced out a rough outline on some Christmas style flannel I had leftover from making these ornaments.

I cut a piece of terrycloth the same shape. I also cut a soaker from two layers of terrycloth and a layer of flannel.


After sewing wrong sides together, trimming the seam allowance, adding elastic on the back and legs, flipping them inside-out, and top stitching, here's what it looks like. The middle part is called a soaker, and is for extra absorbency. It is easier to dry the diaper if the diaper and soaker are separate pieces instead of making one thick diaper.

I think it only took about 1 1/2 hours to make it start to finish. Here's what it looks like on my baby.

We'll see how it holds up, but I may be making more of these. Maybe he'll have a different one for every holiday. Why not have a Thanksgiving diaper? How about a 4th of July diaper? I'm excited to come up with some new diapers to add to our collection.

Saturday, November 6, 2010

Message Board


My sister-in-law will be going off to college next year. I thought this would be the perfect Christmas present to use in a dorm room or small apartment. While looking for ideas for her, I found this blog:
Photobucket
and a great idea for a message board.

I love it! Here's my version.

You write on the glass in the picture frame. I added some painted clothespins for pictures/notes/keys/whatever she wants to clip on. I used mostly hot glue to keep it all together. The beads are on beading wire attached to nails, so they are pretty strong. I had to cut the cardboard that the fabric is glued to in order to make it fit into the frame. The added thickness of the fabric made it not fit until I cut it. Make sure you check before you glue it all on, like I should have.